
1 |
|
执行以下语句使脚本具有执行权限
1 | chmod +x ./switch_net.sh |
掌上公交提供了实时的公交查询,功能做的挺好的,就是广告超级多,体验超级差,有开屏广告,弹窗广告,后台却换广告,暂时没找到可以替代的软件,而已没有提供会员去广告的功能,希望该软件能出一个会员免广告版本,我可以考虑充个会员,无奈只能想办法怎么去屏蔽一下广告,经过摸索发现Quantumult可以设置屏蔽相关站点.瞬间清爽了,设置如下.
[TCP]
HOST,api-access.pangolin-sdk-toutiao.com,REJECT
HOST,telemetry.sdk.inmobi.cn,REJECT
HOST,dg.k.jd.com,REJECT
HOST,kepler.jd.com,REJECT
HOST,baichuan-sdk.taobao.com,REJECT
HOST,qzs.qq.com,REJECT
HOST,cpu-openapi.baidu.com,REJECT
HOST,log-api.pangolin-sdk-toutiao.com,REJECT
HOST,caclick.baidu.com,REJECT
HOST,publish-pic-cpu.baidu.com,REJECT
IP-CIDR,112.49.27.244/24,REJECT
HOST,www.huyue.best,REJECT
HOST,toblog.ctobsnssdk.com,REJECT
HOST,mobads.baidu.com,REJECT
HOST,mobads-logs.baidu.com,REJECT
HOST,sf3-fe-tos.pglstatp-toutiao.com,REJECT
HOST,ulogs.umengcloud.com,REJECT
HOST,mi.gdt.qq.com,REJECT
HOST,ulogs.umeng.com,REJECT
HOST,v2.gdt.qq.com,REJECT
HOST,errlog.umeng.com,REJECT
HOST,ios.bugly.qq.com,REJECT
HOST,sdk.e.qq.com,REJECT
HOST,userlink.alicdn.com,REJECT
HOST,api.lytaohuitao.com,REJECT
HOST,audid-api.taobao.com,REJECT
HOST,sdkm.w.inmobi.cn,REJECT
HOST,adashbc.ut.taobao.com,REJECT
SSH into the server
SSH into the server running your HTTP website as a user with sudo privileges.
Install snapd
You’ll need to install snapd and make sure you follow any instructions to enable classic snap support.
Follow these instructions on snapcraft’s site to install snapd.
Ensure that your version of snapd is up to date
Execute the following instructions on the command line on the machine to ensure that you have the latest version of snapd.
1 |
|
Remove certbot-auto and any Certbot OS packages
If you have any Certbot packages installed using an OS package manager like apt, dnf, or yum, you should remove them before installing the Certbot snap to ensure that when you run the command certbot the snap is used rather than the installation from your OS package manager. The exact command to do this depends on your OS, but common examples are sudo apt-get remove certbot, sudo dnf remove certbot, or sudo yum remove certbot.
If you previously used Certbot through the certbot-auto script, you should also remove its installation by following the instructions here.
Install Certbot
Run this command on the command line on the machine to install Certbot.
1 | sudo snap install --classic certbot |
Prepare the Certbot command
Execute the following instruction on the command line on the machine to ensure that the certbot command can be run.
1 | sudo ln -s /snap/bin/certbot /usr/bin/certbot |
Choose how you’d like to run Certbot
Either get and install your certificates…
Run this command to get a certificate and have Certbot edit your Nginx configuration automatically to serve it, turning on HTTPS access in a single step.
1 | sudo certbot --nginx |
Or, just get a certificate
If you’re feeling more conservative and would like to make the changes to your Nginx configuration by hand, run this command.
1 | sudo certbot certonly --nginx |
- 设置终端代理
最新的 ShadowsocksX-NG 已经支持终端代理, 我们可以如下图复制得出:
1 | export http_proxy=http://127.0.0.1:1081;export https_proxy=http://127.0.0.1:1081; |
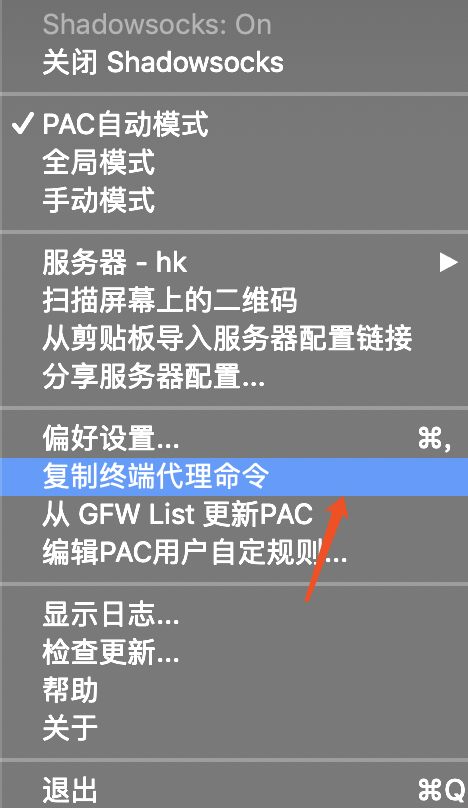
为了方便, 我们可以制作一下别名
1 | alias setproxy='export http_proxy="http://127.0.0.1:8001"; export HTTP_PROXY="http://127.0.0.1:8001"; export https_proxy="http://127.0.0.1:8001"; export HTTPS_PROXY="http://127.0.0.1:8001"' # 设置终端代理 |